Over the last 24 years, I’ve taught tens of thousands of people how to juggle. You guessed it! A lot of the people who I’ve taught were kids. I actually first learned how to juggle when I was 8 years old. My dad came home one day after work and had a new skill that he shared with my brothers and I.
Before you can teach your kids to juggle, you need to make sure that you personally know how to juggle.
Watch this video to learn how to juggle:
After you have learned yourself, there are a few different things to keep in mind when you are teaching your kids to juggle.
In the full Juggling Secrets Academy course that I have, there’s a specific module that teaches you how to teach your kid to juggle.
However, I wanted to make this a free resource to those of you who just want the overall outline and don’t need the exact step-by-step processes.
The first step to teaching your kid how to juggle.
First, you need to make sure that your kid wants to learn to juggle. If they don’t, the whole thing is going to be a bust.
Lucky for you, juggling is something that the majority of kids want to learn how once they see someone do it. That’s why it’s so important for you to learn (use the video above) so you can show them you can do it.
After that, you’ll need to let them know that the process might be difficult for them, but if they stick with it and practice they will be able to do it. I’ve found that kids are much better at failing than us adults are. They know that things take time, but it’s still important to let them know they’ll need to practice.
Once you’ve had the little chat with them you need to get 3 juggling balls. Ideally, you would get one of the recommended juggling balls here (link opens in new tab).
But you can use beanbags or even tennis balls. Most people have tennis balls at their house. Just so you know, tennis balls are pretty difficult to learn with because if they hit each other in the air, they’ll bounce all over the place. That’s why I recommend certain juggling balls. You just need to make sure the balls are the same size and weight as the others.
If you have different sizes and/or weighted objects and you’re learning, it’s going to be difficult.
Now we get to the fun stuff!
The actual pattern starts with throwing one ball from hand-to-hand in an arc. You want to make sure that the throw gets thrown to the opposite shoulder and a little above eye level.

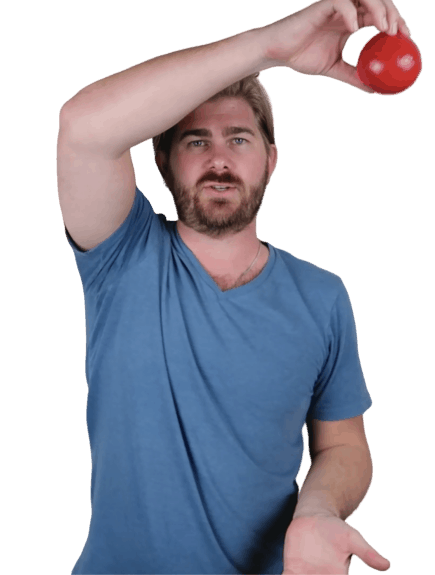
Where my hands are pointing are where you want the throw to get to each time. The most important part of juggling is actually getting the throw to the right spot. If the throw doesn’t hit the right spot, it makes the whole pattern fall apart. You want to make sure your kids are throwing the ball high enough and giving them enough time to catch the ball.
If they throw it too low, it makes it very difficult to juggle later on. One common issue that happens when kids are doing this is that they’ll reach up to catch the ball. You want to let the ball fall towards your hands and not reach up. They should keep their arms at around a 90-degree angle from their side.

When the ball reaches its peak (where the ball is in the picture), it will fall down directly to your hands. You don’t want your kid to reach up. It should fall down directly into their hand if the throw goes to the right spot. This is a crucial step to get comfortable with before they move onto two balls. I recommend having them do this for 30-50 throws in a row so they can get comfortable with it.
The next step is juggling two balls.
The pattern is the exact same as when you are throwing the ball back and forth with one ball.
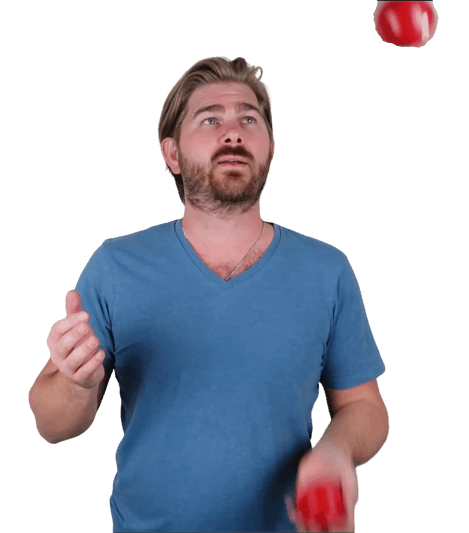
The main difference here is that once the first ball reaches its peak, you’ll throw the second ball.

In this picture, you see that the ball at the top of the pattern is starting to fall. That’s the moment that you’ll throw the second ball. You can see in this picture that my arm is in the motion of throwing.
I’ve found that when teaching kids have them say the words “throw, throw” so that they know what to do. You don’t want them to pass the ball from hand-to-hand. It’s important to make sure that they throw both balls.
Just like with one ball, you want to make sure that your kid can do this for 30-50 times in a row without messing up. They’ll get it pretty quickly because it’s challenging for them.
You’re lucky you get to watch them learn. It’s one of my favorite parts about teaching kids how to juggle. When their eyes light up when they “get it”, it’s great.
Time for the third ball…
This is where it gets tricky… so to start off, you’ll want to let your kid know that they need to start with 2 balls in one hand, and one ball in the other. If your child is right-handed, they’ll probably want to start with two balls in the right hand. Vice versa if they are left handed.
We’ll say they are right-handed (I am) so we’ll go with that. The idea is that you’ll have to tell them to say “throw, throw, THROW” just like with what you taught them for 2 balls.
So it’ll go right-hand throw, left-hand throw, right-hand throw.
The hardest part will be the third throw. They’ll be used to throwing the first two, but they might try to shuffle the ball from hand-to-hand instead of throwing. That’s why it’s so important for you to remind them to say “throw, throw, throw” out loud. It’ll tell their brain what to do and sort of override what we naturally want to do.
When the first throw reaches its peak, they throw the second, when that reaches the peak, they throw the third…
then you stop them!
You want them to only focus on the first three throws for now. The reason you only want them to do 3 throws is because that’s known as the “flash” pattern.
The first three throws are the most important. Practicing this over and over again is going to strengthen the pattern and build up their confidence. Once they get to 50 “flashes” they’ll be ready to go on from there.
Common errors are throwing the ball out in front of them. If this happens, the easiest thing is to have them stand in front of a wall so the ball hits the wall. This will also show them they can’t reach out to throw the ball. That’s actually what is happening when the ball gets out in front of you.
The throw isn’t going up and over, but it’s going OUT and over. So standing in front of the wall will teach them it needs to get tossed up and over and not outwards.
Another error is not throwing the ball high enough. If your kid is struggling with the speed of the pattern it’s most likely because the throws aren’t going high enough. You want to remind them that the ball should go above their shoulder and a little over eye level. This will give them enough time to catch the ball.
Recent Posts
If you are searching for this, you most likely already know how to juggle so we're just going to get right into this. I bought a few different glow in the dark juggling balls to review and give...
Are you a fan of the show, The Office? If so, you've probably seen the scene of Will Ferrell aka Deangelo Vickers. One of the best parts of this is probably when you notice Erin and Creed in...